
A German Gardening Technique:
Understanding the Hügelkultur Gardening Method (Part-2 of 3)
Last updated 2/21/2023 at 12:01pm
Courtesy of Farmers Almanac
Gardeners, we have experienced what I would consider a fantastic week, leading this gardener to believe spring may have arrived a bit early this year. Be mindful if you choose to plant early and be prepared to cover 'tender plants' with a frost blanket. Planting a spring garden is a true joy but with challenges for novice and seasoned gardeners alike. Most of us are ready to replace the austere color of winter with a kaleidoscope of vibrant colors associated with spring, as well as breathing new life into our garden areas. Some gardeners have a capability of exercising restraint while selecting plants at local garden centers, nurseries, or "pop-up" roadside vendors. Each merchant provides a plethora of new or trending plants for sale during spring. The ability to refrain from "uber-purchasing" plants is completely lost on me. In fact, if you are anything like me, you are ready for garden areas to 'come alive' now, eagerly setting out plants in hanging baskets, planters, or beds-our mantra being-sooner is better! For this gardener, the thought of exercising restraint is literally summed up by saying: "There's no way I have too many plants, there's still room in the (fill in the blank) car, truck, or trailer"! Okay, well enough said about my "plant-obsession", let's move on to this week's 2nd of a 3-part series understanding a German gardening technique, hügelkultur.

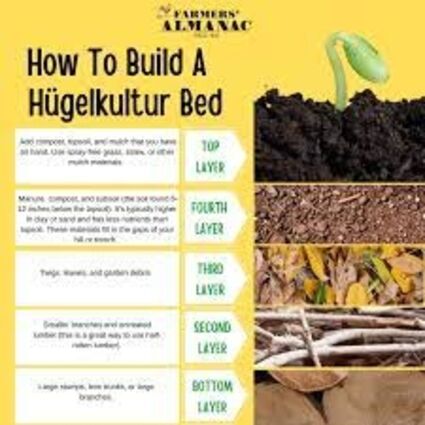
Building a raised hügelkultur garden bed initially begins by removing 2 to 4-inches of the soil surface. The removed soil will be used later in the process, so placing it on a tarp or on top of paperboard boxes will make returning it to the bed much easier. When digging the bed, one technique is to leave an 8-inch perimeter of hard-packed soil (creating a foundation or ledge), which becomes the foundation to support the garden beds' walls. Another technique buries bricks or cement blocks, forming an 8-inch perimeter (re-purposing bricks and blocks is cost effective) to support the beds' walls, though leveling the foundation will mitigate them from sinking over time. Once the soil from the interior base of the bed is removed, dig a shallow trench in the beds' center, from end-to-end. Fill the trench with 2-inches of fresh grass clipping or manure, leaves, unfinished compost, or shredded paperboard boxes. These materials are called 'green waste' which adds an organic layer of nitrogen while decomposition occurs. Top the 'green waste' layer with wood components: large logs, branches, limbs, wood chips, or even bark. Fill void spaces between the limbs and branches with more 'green waste', tightly filling and compressing the debris as you work.

Let me mention here gardeners, before you begin building the bed, planning the hügelkultur raised bed goes a long way to ensuring its success. The amount of wood incorporated into the bed must fall below the halfway point of the raised bed's height. This means a 40-inch tall, raised bed would have no more than 20-inches of wood debris, leaving 20-inches of soil remaining above the wood's surface level. Conversely, a shorter bed, say, 15-inches in height would utilize a maximum of 6-inches of wood, otherwise there will not be enough available growing medium (soil) for plant roots. Keep in mind there must be at minimum 8 to 12-inches of garden soil available for plant root development and structural integrity, noting that more soil is always better.

Once the wood layer is in place, top with more nitrogen-dense organic material. Adding at least 2-4 inches of this material. For this layer, I used a 2-inch layer of fresh manure and another 2-inch layer of composted sheep and goat manure. Packing the debris down in stages is the key to success, as this prevents the soil from displacing and falling between the pieces of wood, while also creating a protective nitrogen layer.

The choice of wood can make a difference in the success of hügelkultur bed. There are certain types of trees which are allelopathic. Some allelopathic compounds can inhibit plant growth and seed germination, which might be problematic if used in a vegetable garden! Utilizing wood materials which contain allelopathic compounds could possibly migrate, finding their way into the plants root zone. It's simply best to avoid a these types of wood, limbs, and leaves when layering a hügelkultur bed. Some of the more common allelopathic trees to avoid using include black walnut, red maple, red oak, sycamore, goldenrod, American elm, and there are many more.

Next week we will be the final installment of the three-part series, completing the hügelkultur gardening method. Until next time fellow gardeners! Let's go out and grow a greener, more sustainable world, one plant at a time!
For gardening questions answered or detailed information: email me: [email protected] or contact the Orange County Master Gardeners Helpline: (409) 882-7010 or visit our website: https://txmg.org/orange, Facebook: Orange County Texas Master Gardeners Association or Email: [email protected].
Mark your calendars! The Orange County Master Gardener Associations Annual Spring Plant sale is Saturday, March 18, from 8am until 1pm at Cormier Park, located at 8235 FM 1442, Orangefield.
Reader Comments(0)